Switch Node
Inputs
|
Outputs
|
| Version Introduced 2.3-b2 |
The Switch Node allows for basic control flow by transmitting an output of either one input (A) and another (B), depending on the value of trigger. When trigger is low (0) the node emits the last value consumed by input port A, but when trigger is high (1) the node emits the last value consumed by input port B.
Switch Nodes were introduced in firmware version 2.3-b2, and currently have no settings.
Example Usage
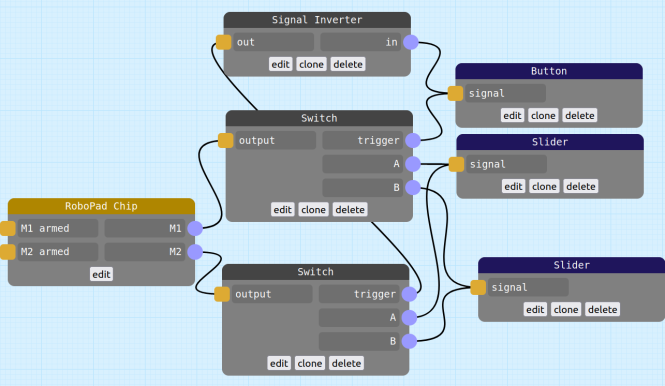
The nodegraph below employs a switch node to switch which way around two Sliders are used to drive the Built-in HBridge Motors M1 and M2 using a Button set to toggle mode. The operation of the nodegraph can be understood by following the control signals from right to left: In its default inactive state, the Button will emit a signal of 0, this will trigger the top Switch Node to "connect" its A input to its output, effectively connecting the top Slider to the Chip Node's M1 input port, controlling that motor. Conversely, the button signal is also connected to an Inverter Node, which consumes the button's 0 and inverts it to be 1. This high signal is then sent to the trigger of the lower Switch Node which, acting on the 1 from the inverter, connects its B input to its output, effectively connecting the bottom slider to the Chip Node's M2 input port.
Now imagine that the robot has flipped over, so what was the left wheel is now driving on the right, and what was the right wheel is now driving on the left - the driver might want to "flip" each of the control Sliders so that they align the same way they did before. To do this, they push the Button, which activates it and toggles its output to 1. Immediately, the top Switch Node receives that 1 and switches its output from A to B, and the bottom Switch node receives a 0 (courtesy of the Inverter Node inverting the Button's 1), so it switches its output from B to A. This effectively connects the top Slider to the Chip Node's M2 input port, and the bottom Slider to the Chip Node's M1 input port - the opposite of what it was before the Button was toggled.
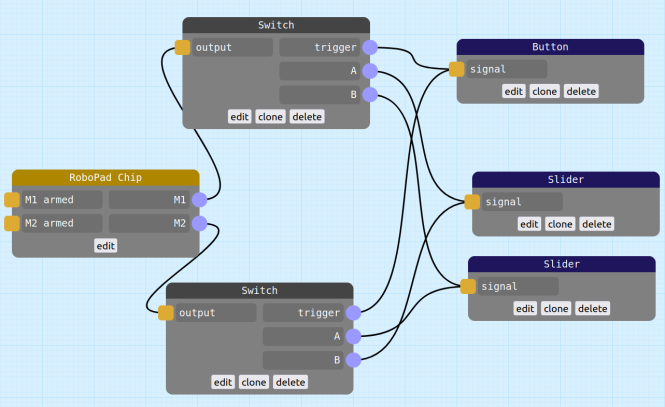
Switch Nodes can take a bit of getting your head around. For instance, while the nodegraph above seems simple and is straight-forward to understand, there is actually a simpler, more efficient version that performs exactly the same function. The below nodegraph is identical, except instead of a signal inverter, the Sliders have been connected to the lower Switch Node the other way around (in the upper Switch Node, the upper Slider is connected to A with the lower connected to B, while in the lower Switch Node the upper slider is connected to B and the lower is connected to A). Again following through the signals from the UI elements on the left to the Chip Node on the right, you can see that when the Button node is in its inactive state (emitting a signal of 0) both Switches are emitting their A inputs as outputs - here connecting the top Slider to M1 (via the top switch) and the bottom Slider to M2 (via the bottom switch). When the switch is pressed and toggled to its active state (emitting a signal of 1), both Switches start emitting their B inputs as outputs - now connecting the top Slider to M2 (via the bottom switch) and the bottom slider to M1 (via the top switch).


